How to Update Apt Repository on Kali Linux

Back up the current sources.list first. 1 sudo cp /etc/apt/sources.list /etc/apt/sources.list.backup Well, run this command then. 1 sudo echo "deb http://http.kali.org/kali kali-rolling main non-free contrib" > /etc/apt/sources.list Now you can run apt update command! Happy networking! 😎

How to Dockerize a Full Stack MEVN Application

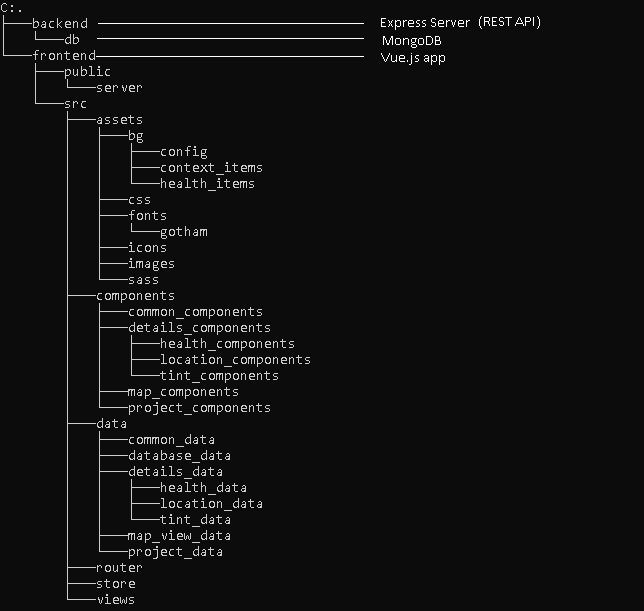
First things first. Let’s check the directory structure of the app. A Full Stack MEVN Application Let’s take a look into the DB image first. 1 2 3 4 5 6 7 8 9 FROM mongo:latest WORKDIR /app COPY . /app ENV MONGO_INITDB_ROOT_USERNAME=root ENV MONGO_INITDB_ROOT_PASSWORD=password EXPOSE 27017 I thought importing dump data should be working if I used CMD or ENTRYPOINT. It didn’t work though. So I picked a solution using exec and shell script.

How to Setup a Reverse Proxy With Let's Encrypt SSL Certificates Using Docker

Let’s check our docker compose file first. 1 2 3 4 5 6 7 8 9 10 11 12 13 14 15 16 17 18 19 20 21 version: '3' services: nginx: image: nginx:1.15-alpine restart: unless-stopped volumes: - ./data/nginx:/etc/nginx/conf.d - ./data/certbot/conf:/etc/letsencrypt - ./data/certbot/www:/var/www/certbot ports: - "80:80" - "443:443" command: "/bin/sh -c 'while :; do sleep 6h & wait $${!}; nginx -s reload; done & nginx -g \"daemon off;\"'" certbot: image: certbot/certbot restart: unless-stopped volumes: - .

How to Host Wordpress Using Docker

Let’s the docker compose file first. 1 2 3 4 5 6 7 8 9 10 11 12 13 14 15 16 17 18 19 20 21 22 23 24 25 26 27 28 29 30 31 32 33 34 35 36 37 38 39 40 41 42 43 44 45 46 47 version: '3' services: wp: image: wordpress:latest ports: - ${IP}:80:80 volumes: - ./php.conf.ini:/usr/local/etc/php/conf.d/conf.ini - ./wordpress:/var/www/html environment: WORDPRESS_DB_HOST: db WORDPRESS_DB_NAME: "${DB_NAME}" WORDPRESS_DB_USER: root WORDPRESS_DB_PASSWORD: "${DB_ROOT_PASSWORD}" depends_on: - db pma: image: phpmyadmin/phpmyadmin environment: PMA_HOST: db PMA_PORT: 3306 MYSQL_ROOT_PASSWORD: "${DB_ROOT_PASSWORD}" ports: - ${IP}:8080:80 links: - db:db db: image: mysql:latest ports: - ${IP}:3306:3306 command: [ '--default_authentication_plugin=mysql_native_password', '--character-set-server=utf8mb4', '--collation-server=utf8mb4_unicode_ci' ] volumes: - .

How to Auto Start OpenVPN Client on Ubuntu Bionic

Launch OpenVPN client as a daemon. Here I assume you already have your own cert file: filename.ovpn. 🙂 Modify its file extension to a conf file like so: 1 mv filename.ovpn filename.conf Move the file inside /etc/openvpn directory like so: 1 mv /path/to/filename.conf /etc/openvpn/ OpenVPN client service name would be openvpn@filename. Well, you might already know what to do to launch the service. 1 2 sudo killall openvpn sudo systemctl enable --now openvpn@filename Reload the system daemons.